Wednesday, May 15, 2013

Review! Lorac Perfectly Lit Oil-Free Luminizing Powder in Spotlight

Lorac Perfectly Lit Oil-Free Luminizing Powder in Spotlight has been on rotation in my makeup bag for a while now.  It is another perfect example of why I like to test a product for a while before handing out an opinion on it.

To put this in perspective, I currently have over 40 reviews started and in draft form.  I take pictures first, then swatches, then I try it out.  Then I try it again, and again, and again.  I record my thoughts as I go along, updating all the drafts as I drift from product to product.  sometimes I find myself reaching for a particular item with persistent regularity.  Those items get my highest marks.  Then, sometimes, a product will be left in my makeup bag, to be trialed several more times, but the trials end up being for the sake of trialing, and not because I like the product.  Lorac Perfectly Lit Oil-Free Luminizing Powder in Spotlight falls into the latter category.

Here was my preliminary analysis, after wearing it for a week:

This powder is the exact shade of my skin, so it doesn't do anything for me as a highlighter.  This would not work for ultra-pale girls.  Since I can't use it as a highlighter, I have been using it as an eyeshadow.  The cream eyeshadows I have tend to fade by the end of the day, and the results makes me look tired.  I tap my big, fluffy powder brush into this, and then pat it over my entire lid (with my eyes closed), just patting it on.  It brightens up my eyes, and adds a bit of tawny color.  The result makes me look more awake.

Because it doesn't work as a highlighter for me, and it will probably take me a little bit of forever to use all this up with the way I use it, I don't plan to re-purchase it.

Then, it sat in my makeup bag, making appearances as a end-of-the-day brightener for my eyeshadow.  I found it rather annoying, actually, to have such an expensive product feel like such a let-down.  I had purchased it as part of a sample set from Sephora, so this size is more of a deluxe trial size (at about half the full-size), but the full-size product is $32.  Every time I saw this little compact, I would frown at it, like a disapproving instructor.  It came in a sample set of blushes, highlighters and bronzers, so I expected this to be a highlighter.

Then one day, the revelation...  This is an all-over illuminator, not a highlighter.

After wearing my makeup for the day, I was getting ready to go out for a bit that evening, so I was touching up my makeup.  I was feeling too lazy to start over, but I had a few red spots I needed to cover.  I grabbed this, and dabbed it on with a cotton ball (I had just washed all of my brushes before I noticed the redness).  It covered them all right up, flawlessly.  I started patting it under my eyes to boost my concealer, and it was like magic!  I looked SO rested!  I swept a bit over my cheekbones, and I looked even more fresh!  I came to the conclusion that I was trialing this product mostly during the morning when my makeup was fresh, or only using it over my eyeshadow mid-day to look more awake.  I don't think it really stands out on freshly applied makeup, especially since I aim for a dewy look; this powder just ended up looking like a setting powder when used on fresh makeup, and not a shine-a-spotlight-here highlighter. 

Now I'm using the powder to set my undereye concealer, and to touch-up any redness that might crop up during the day.  I am so glad that I left this powder in my makeup rotation, and it had a chance to show what it can do.

Before:

After.  It's very subtle, and applied over fresh makeup.  Also, this picture was taken with a bit more natural lighting, because otherwise it looked exactly the same as the "before" picture:

I can see myself re-purchasing this once I run out.  

The shimmer captured the flash, so this color is much lighter than it is in real life:
This color is more true-to-life:

Monday, May 13, 2013

Review! Laura Mercier Shimmer Bloc in Golden Mosaic, PLUS Garnier BB Cream update

Laura Mercier Shimmer Bloc in Golden Mosaic is intended to be used as a bronzing highlighter.  On first take, I felt it was too dark for my skintone.  However, using a much lighter hand, it has become my go-to bronzer for this Spring.  I use it in the hollows of my cheeks, and at my temples.  I have tried using it as eyeshadow, but even over primer, it creases terribly on the lid.  It has too much shimmer to be used for contouring the nose.  

It picks up very easily on a blush brush, and glides on very smoothly.  It blends extremely easily, and seems to melt into my foundation and leaves a seamless finish.  

Also, because it is so shimmery, it photographed very light in the bottom photo.  In real life, that top color is a very deep coppery brown.  The size I have is a deluxe trial size (purchased with a Sephora cheek, highlighter and bronzer trial set), and is about half the size of the regular product.  It takes so little of this product that I can't imagine hitting pan for at least a year... if not longer.

At $40, I can see a bit of hesitancy at trying this, but I really love it.  So many bronzers look orange and fake on me.  I like that I can focus my brush on a particular color to alter the depth of shading.  I've tried a few drugstore bronzers, and I haven't found one that I like as much as this one.  So, I can easily see myself re-purchasing this once I run out.

-Side Review-
I have been using it over Garnier BB Cream Skin Renew Miracle Skin Perfector. (You can see my review on that here.)  I ran out of my Laura Mercier Illuminating Tinted Moisturizer, and dug the Garnier up out of my makeup pit to use while I ponder which tinted moisturizer I want to use this summer.  I've been using a hefty dollop of it (unlike in the review), and I've come to the conclusion that I'm pretty happy with how the Garnier is performing.  I wouldn't say it lives up to its name, but it is moisturizing, offers a light-to-medium coverage, and it is playing very well with my other cosmetics.  Surprise of all surprises, it is allowing powder blushes to look nice!  You regular readers know I really HATE wearing powder blushes, so you know that's one heck of a statement coming from me!


Friday, May 10, 2013

Review! Algenist with Alguronic Acid Regenerative Anti-Aging Moisturizer

I got this as a sample from Sephora.  The sample only had enough for one use.  A full-sized tub costs $90.

They say:
"While pursuing renewable energy solutions, a biotechnology laboratory in San Francisco unexpectedly discovered the powerful regenerative properties of alguronic acid, the bioactive compound available only in Algenist products."

I thought it smelled really bad - almost like nail polish remover.  It also stung a little bit when I first applied it (yes, I applied it even though it smelled bad).  As it was a sample, it shouldn't have been expired, and some of the reviews on Sephora mention a bad smell, but some say that it doesn't smell at all, or smells pleasant.


I'd like to smell a bottle of it in-store, to see if the smell of the sample I got was a fluke.  I am extremely interested to try this for a longer period of time, but it's a pretty steep price tag for a product that you won't really know if it works until you've used it constantly for several weeks.

I also noticed that there is a distinct lack of other bloggers with before and after photos using this line of products.  It seems as if, were this a miracle in a bottle, the blogger world would have gone crazy by now and reviews wouldn't be vary sparse.


Additionally, the claims made on Sephora for the research results say:
Research results:
In comparison testing, Alguronic Acid outperformed other well-known active antiaging ingredients, demonstrating superior antiaging benefits. Average results measured following an in vitro test with Alguronic Acid:
- 55% increase in cellular regeneration
- 32% increase in elastin synthesis
- 26% decrease in melanin production
Following a self-assessment of 100 women, within 10 days of daily use:
- Skin density (suppleness, elasticity) is restored in 86% of subjects.
- Skin radiance is boosted in 93% of subjects.
Within 4 weeks of daily use:
- Deep wrinkles are minimized in 78% of subjects.
- Skin is noticeably tightened and lifted in 81% of subjects.

The issue I have here is that the results that showed the 55% increase in cellular regeneration, the 32% increase in elastin synthesis, and the 26% decrease in melanin production were all done in vitro, which means the product was performed on cells within a test tube, basically, and were not performed on skin actually living on a person's face.

Furthermore, the results of actual people were all done by self-assessment, and the percentage of change is the percentage of people who noticed any change at all, and not the average percentage of actual improvement.

This type of percentage reporting is pretty common in the cosmetics industry, but I think it bothers me more here, because this brand is purporting itself to be extremely science-based.  All big-name cosmetics companies have chemists employed, so science (at some level) is employed in most cosmetics.  But, this brand is really upping the science factor, and I think percentage reporting of this type relies on the typical consumer to not be savvy enough with technical grammar to catch the subtle differences from the in vitro tests to the self-assessments.

Finally, I searched for the clinical trials results, but I haven't been able to find them online. 

Overall, I'd have to call this review inconclusive.  The sample wasn't big enough to get results from, and the information I found online wasn't convincing enough to place reliance on.

Wednesday, May 8, 2013

Review! Korres Volcanic Minerals Volumizing Mascara

Continuing my quest for my perfect mascara, next up is Korres Volcanic Minerals Volumizing Mascara.

Sephora says:
What it is:
The blackest, black mascara derived from volcanic soil that increases lash volume by 600 percent.

What it does:
This Obsidian black is formulated with volcanic minerals for the deepest, darkest color and an explosive increase in lash volume. These rich pigments blend with natural film formers to create a flexible yet strong coating that covers every lash. Volcanic Minerals Volumizing Mascara provides a glossy, luminous finish with a flexible conditioned feel, without any smudging or flakes for optimal, long-wearing benefits. The tapered brush head with unique cross-hatch bristles ensures smooth, clump-free application that grabs even the tiniest microlashes.

What I say:
I wasn't over the moon about this mascara.  It does have my favored brush type; a fluffy spoolie.  However, right upon opening the tube, the mascara was clumpy.  I applied it anyway - because I've never used it before, so I don't know if it is supposed to be that way - and it was a clumpy mess.  I added some boiling water to it (a few drops), and that got rid of the clumps.  The effect was very natural, with good definition.  However, it did not give that promised increase in lash volume.  Of course, that could have been due to me adding the water, but there's no way for me to tell without going back to the store and trying another one.

The clumpy formula and the lack of dramatic volume is steering me away from this mascara.  While I don't dislike it, I wouldn't recommend it if someone asked.

Pictures!
Before:


After!


Monday, May 6, 2013

Review! Benefit Sun Beam

I really like Benefit's sunbeam. It came as part of this little set that I picked up at Sephora.  There are several mini-sets of the Benefit products, and I think they are a great way to try out the brand.

Benefit says "this golden bronze highlighter gives you a natural, sunkissed radiance. Dot & blend over makeup on to cheek & brow bones for a bronzed glow that complements all skintones. It’s liquid sunshine in a bottle!"


Here it is blended out on my hand.  It is very subtle on my skintone, and blended almost perfectly to match.  I love the golden sheen it gives off.  I like this color a lot more than I like highbeam, because of that golden color.  I didn't think I would like it because it looks pretty intense before it is blended out, so I would encourage you to swatch it for yourself if you can.

Here it is swiped on my hand.  Can you see it?
Here it is before blending... can you see it now?:
Here it is after blending.  Now I know you can barely see it.:
I love how well it blends, and that it doesn't go crazy in flash photography.  Also, you can hardly see it in photos (see -or not- above), even with a high-quality camera.  I gave up trying to photograph it, because I would have had to PILE it on for the camera to really pick it up, and that isn't a good representation of how you would wear it anyway, nor of how it would photograph in a real-life situation.  I really like how it just blends into my skin to make me appear radiant, instead of making my makeup appear radiant.  This fits in really well with my current makeup choices, which tends to steer clear of putting powders on my face.  There are a lot of powder shimmer bronzers, but not many creams.  I hadn't tried a bronzing cream before, and now I'm totally smitten.

To use it, I like it best with very natural, minimal makeup.  I applied a lot of moisturizer and a tiny bit of foundation to my face (a home-mixed tinted moisturizer, basically), and then put some cream blush on my cheekbones.  Then I put a stripe of Sun Beam on the top part of my cheekbones, going up and over my nose, to the other top of my cheekbones, starting and ending at my temples.  I put a dab on my Cupid's Bow, and down the center of my nose; basically using it as a bronzing highlighter, and blended it with my fingers.  I did not use any powder to set, because that will cover up the golden sheen, and I like a dewy look.

The one thing I can't get past is the price.  At $26 for less than half an ounce, it's an expensive purchase.  You can do what I did, and pick this up on one of Benefit's many mini-kits, and try out several of their products at once.  It will save you from the sticker shock, but be aware that the mini sizes are itty-bitty.

I like it enough to try to find a dupe, so that tells me that if I am unsuccessful, I'll probably end up biting the bullet and buying this one again.  If you don't mind using powders, you can probably find a shimmery bronzer that will work comparably well.  Has anyone out there found a similar product you would recommend?

Friday, May 3, 2013

Review! Sephora Collection Moonshadow Palette - In The Night

This week I trialed Sephora Collection, Moonshadow Palette - In The Night.  I loved the In The Nude palette, so I had very high hopes for this one.

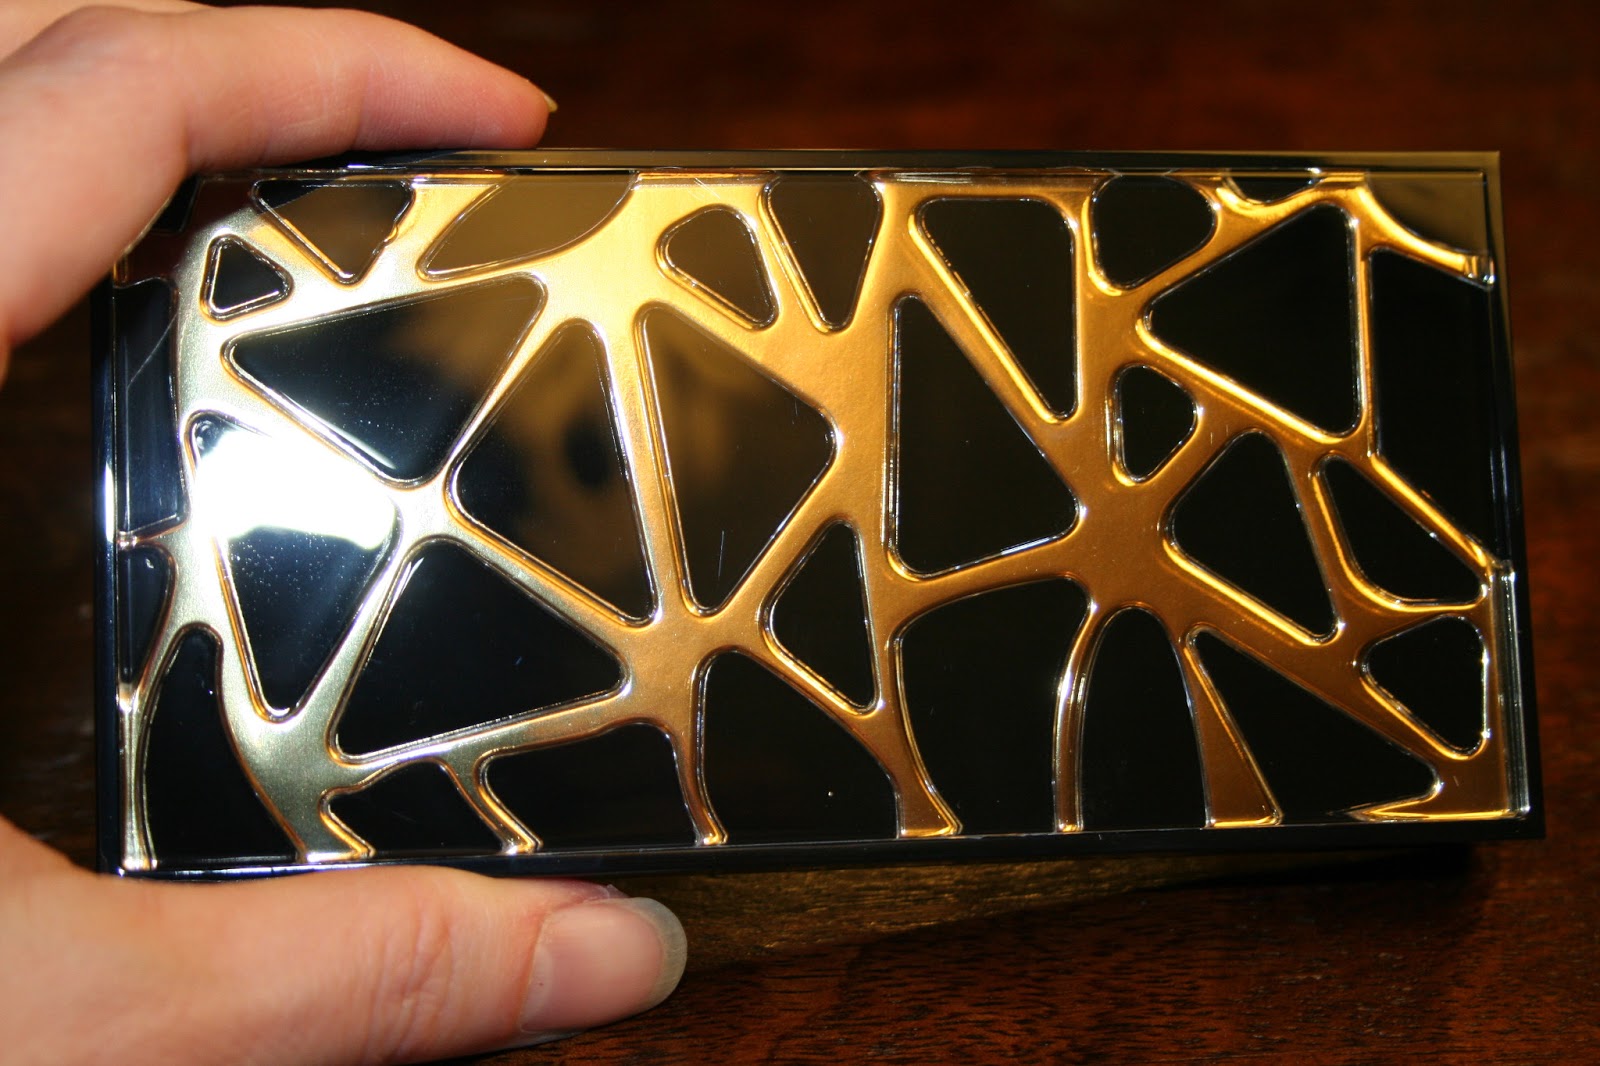
Like In The Nude, this one has a hard plastic case.  I think this case has a nicer design than the other one, because it is a 3-D design.  It looks more high-end, and while I usually don't like anything that resembles and animal print, this one is done nicely.

Here you can see how the black spots are raised off of the gold background:

The interior has a full-length mirror, and 10 eyeshadows.

One thing I have seen many other people comment on is the fallout inside the case.  When you use the colors dry, the pigment and sparkle will scatter everywhere, and there isn't anything you can do about it.  There is a simple way to ensure that you don't have any fallout, if you intend to use the colors wet most of the time, though.

Wet a clean eyeshadow brush until it is completely full of water, and then touch the brush to the top of the eyeshadow dome.  It will immediately soak up all the water in the brush.  Re-wet the brush, and then swipe the brush on top of the eyeshadow dome, going all the way around the dome, so that you get the entire surface swiped down with water.  I haven't experienced any fallout in the case when using this method.

This is what the shadow looks like after it has been wet:

And, here they are swatched wet:
Black Gold was a shock - it is a black base, with a gold sheen and gold glitter.  I was expecting the glitter, but not the sheen!  It is really stunning.

Onyx is a matte black, and I feel like it flopped.  It wasn't a deep, dark black.  It wasn't grey, but it was... a soft black?  No, not even that.... more like faded black jeans.  Yes!  Faded black jeans describes it perfectly.  I was really disappointed with that one, but it might come in handy for a grey smokey eye.  Maybe.

And here they are in ambient light.  They look so different depending on the lighting!:
Here is a better picture of Platinum and White Gold.  White Gold was the most shocking.  It looks like a white highlighter in the pan, but once you put it on, it is a white base with a golden sheen and then white glitter.  It is lovely!

Two favorites were Light Gold and Gold Metal.  They swatched out very beautifully with a lot of intensity.  Gold Metal looks like 24K gold:
Applying eyeshadow wet is a technique all in itself, so be prepared to experiment.  It is a lot like painting with acrylic paints, in that you can get a very defined line, but you can also blend the points where colors meet, while on the eyelid, if you work quickly.  I suggest learning on your forearm.  Use two eyeshadow brushes, apply one dark color, and then the light color.  Using the light color brush, try blending the two together where they meet.  You can try it with more water, less water, adding more water after it applied to the arm, etc.  It is a lot easier, and less frustrating, to practice blending techniques on your arm, rather than on your eyelid. 

If you use these wet, I recommend using a primer underneath.  Otherwise, if you touch your eyes after it has dried, the eyeshadow will completely fall off.  The darker colors will leave behind a wash, but all of the sparkle and most of the color will COMPLETELY FALL OFF.  I'm serious.  If you tend to touch your eyes at all after applying your makeup, I'm not sure that I would recommend this palette to get these intense colors (ie applying them wet). 


In my previous review of In The Nude, I didn't mention this, because I never touched my eyes when I was trialing that palette.  When I trialed this one, there was a lot of dust and grime in the air from the early Spring rains dusting up the Winter grime, and my eyes were irritated from that. 

Now, if you use them dry, be aware that you will loose almost all of that intensity.  Regular primer will NOT keep the glitter on, and you will have some pretty bad fallout.

Enter, Pixie Epoxy.  A very thin layer of Pixie Epoxy, over your regular primer, will hold all of the sparkle, and almost all of the color.  I'm going to go ahead and call this a necessity.  When using the Pixie Epoxy, these colors become extremely wearable for daytime looks, and the shimmer makes it transition to night-time without further application.  You can build up your layers, to the point where you nearly reach the "applied wet" intensity.

Here is a comparison:
And here they are after being rubbed with my fingers:
You can see the full review of Pixie Epoxy here.  I have also tried using the Pixie Epoxy and applying the eyeshadow wet.  It does work to keep the eyeshadow on better, and brings the Moonshadow to the staying power of a normal eyeshadow should you touch your eyes.

This look was done with Pixie Epoxy underneath, but I did not build the layers too much, because I needed a daytime look.  The colors are; Gold Metal at inner corner to center lid, Black Gold from outer corner to center lid, and then center lid blended well (the blending lifted more of the black base off, but in person, there was a golden sheen there), and then White Gold from the crease to browbone, Black Gold at lower lashline and lower lid, and finally, Electro Purple at the lower lid inner corner.:


I included the last two pictures to show how the light still catches the glitter color, and that it is brighter from a bit of a distance.  When viewing eye makeup close-up, it usually looks a lot more sparse than it does if you back up a little bit.

And here is a sparkly nude daytime eye using this method:


That is Peach on the inner lid, Honey Brown at the outer corner to the center of the lid, on the crease and a bit above the crease, and on the entire lower lid, and then Light Gold just below the eyebrow to where the Honey Brown ended above the crease.
 
One little idea - if you are new to wearing super-sparkly eyeshadows (or brights, or deep smoke, or whatever you are trying out), back away from your mirror about six feet, and apply your color from there.  You'll have to do a bit of touch-up when you are done and get a closer look (move back to the mirror), but I think you'll be surprised at what point you stop applying product when you aren't a foot or less away from your project.

In conclusion, I love these Moonshadow palettes.  I like it that I can have a very intense nighttime look by applying them wet, and I can also use them dry to achieve a more subtle daytime look.  They probably aren't the best palette for a beginner, but anyone with a little bit of patience can use it.

Wednesday, May 1, 2013

Review! Fyrinnae Pixie Epoxy

I heard a lot of buzz about Fyrinnae's Pixie Epoxy being THE go-to product to keep glitter eyeshadows from falling out.

It comes it a tube with a doe-foot applicator, much like a lip gloss.  You use this over your regular eyeshadow primer, and under your eyeshadow.  One little dot of it is enough for both eyes.

Once you have it spread over your eyelid, load your eyeshadow brush with your eyeshadow, and then pat (do not "sweep" it on) the eyeshadow onto your lid.  Keep patting on your eyeshadow until you have the desired intensity built, and once all your colors are on, you can blend.

Here are five swatches of the same eyeshadow (from Sephora's Moonshadow Collection; I'll be reviewing the palette this eyeshadow comes in on Friday!), all applied with different bases:

Next, I rubbed my arm about as hard as you would if you were rubbing your eyes really hard.  This is how much eyeshadow ended up on my fingers:
And here is what was left of the swatches:
I think that speaks for itself.


When I used this, my eyeshadow stayed in place all day, with very minimal fallout.  This stuff works, does exactly what it is supposed to do, does it better than any other primer I have tried, and is very affordable.  I highly recommend it!